Vue.js Testing - A High Level Overview
Testing in Vue.js is easy. To start a new project with the testing framework already in place:
$ npm install --global vue-cli
$ vue init webpack my-project
$ cd my-project
$ npm install
$ npm run test
Wait until it finishes and you'll see passing unit and end to end tests. Whoever said the JavaScript ecosystem is a mess?
This is a great starting point, and it helps the newcomer get started with Vue.js testing quickly. But there isn't much guidance available. It's easy for that newcomer to get swallowed up not only in the complexities of testing front end code, but also in all of the unfamiliar packages that this Vue.js template installs and configures for you. It's tough to go Googling for help because they don't even know what packages they are using, or why.
This post won't tell you how to write tests for Vue.js, I'm not even going to explain why testing is important right now. But it will cover the role each of these packages play in testing your code so that you have a good beginning level of understanding about what is happening.
Getting started
To run your tests you type npm run test. Or you can run your unit tests and E2E tests by running npm run unit and npm run e2e respectively.
Wait... isn't npm the JavaScript package manager? Why are we using it to run commands?
That's a great question.
I'm not sure exactly what the original intent for npm run was, but we're using it here as a shortcut method to avoid typing longer commands. All of the commands available are defined in the package.json file in the root directory of the project you created. Take a look, you should see something like this:
...
"scripts": {
 "dev": "node build/dev-server.js",
 "local": "node build/local-server.js",
 "android": "node build/local-server.js",
 "build": "node build/build.js",
 "unit": "karma start test/unit/karma.conf.js --single-run",
 "e2e": "node test/e2e/runner.js",
 "test": "npm run unit && npm run e2e",
 "lint": "eslint --ext .js,.vue src test/unit/specs test/e2e/specs"
 },
...
Ah, that's also how we're running the dev server and executing the build command. npm run dev is a shortcut for node build/dev-server.js. Likewise, npm run unit is a shortcut for karma start test/unit/karma.conf.js --single-run. This gives us our first clue for what's really happening with our testing stack. We're running the karma command - Karma was installed when we did npm install earlier - and the template we used provided a config file for us.
Instant karma's gonna get you
Karma is a bit - well - it's a test runner, which I guess means it runs tests.
So we write tests in Karma, right?
Nope. Karma is just a test runner. It's test framework agnostic, which means you need to find another test framework and Karma will run those tests. Adapters exist for most of the major JS testing frameworks. Their website sums up its purpose succinctly
Karma is essentially a tool which spawns a web server that executes source code against test code for each of the browsers connected.
It's succinct, I didn't say it was easy to understand! Their how it works page does a decent job of breaking it down. Basically, you write code that is most likely intended to be executed in a browser, then you write tests for that code, and Karma glues the two together. It then shows the results of all of the tests.
The config file mentioned in the npm command is our next clue. It should give us some idea of what Karma is doing and hopefully help us move on to the actual test framework.
...
module.exports = function (config) {
 config.set({
 // to run in additional browsers:
 // 1. install corresponding karma launcher
 // http://karma-runner.github.io/0.13/config/browsers.html
 // 2. add it to the `browsers` array below.
 browsers: ['PhantomJS'],
 frameworks: ['mocha', 'sinon-chai'],
 reporters: ['spec', 'coverage'],
 files: [
 '../../node_modules/babel-polyfill/dist/polyfill.js',
 '../../node_modules/phantomjs-polyfill/bind-polyfill.js',
 './index.js'
 ],
 preprocessors: {
 './index.js': ['webpack', 'sourcemap']
 },
 webpack: webpackConfig,
 webpackMiddleware: {
 noInfo: true
 },
 coverageReporter: {
 dir: './coverage',
 reporters: [
 { type: 'lcov', subdir: '.' },
 { type: 'text-summary' }
 ]
 }
 })
}
I'm not going to pretend to understand everything happening in this file. You might never need to edit it. Hopefully, anyway. But skimming through it we learn a few important things:
- we're configuring Karma to use webpack and babel
- we're using PhantomJS as the browser that Karma ties our tests into
- Mocha and sinon-chai are our test frameworks
- we're generating test coverage reports
mughwI' nIS maH
You're probably writing your JavaScript code in ES6. Also known as ECMAScript 6, or ECMAScript 2015, or something. It's hard to keep up. If you're not writing ES6, you probably should start.
Browsers don't entirely understand ES6 yet, so we need a translator. That's where Babel comes in. It compiles/transpiles/translates our ES6 code into plain ol' JavaScript. This happens behind the scenes when we run the build or serve commands that Vue.js gives us. And since Karma expects JS, we need to tie in Babel for our tests too. If you check out your packages.json file you'll probably see karma-babel-preprocessor listed in the dev dependencies. The configuration code for Karma ensures that this happens quietly in the background so you don't have to worry about it.
Webpack is a module bundler. it's really the magic that lets everything happen here - from requiring dependencies, to compiling your code. It's outside the scope of this article, so I'm not going to get into it further, but it's worth learning more.
The friendly ghost
The next piece of the puzzle is PhantomJS. This is a headless WebKit browser.
Remember that we expect our code to be executed in a browser? Phantom does that, but without requiring a graphical browser. We could open up Chrome and hit the Karma server, but Phantom removes this step. Sounds crazy, right? It sort of is. It lets our DOM handling, CSS, and a bunch of other things to work without opening up Chrome.
You can actually run your tests in your browser if you'd like to. It requires installing a plugin, but is otherwise very easy to setup.
Mocha, Mocha, Mocha!
Finally we get to our testing framework! Mocha lets us write something like this
describe('multiply by 3', function() {
 it('should return 9 when multiplying 3 by 3', function() {
 assert.equal(9, multiplyByThree(3));
 });
 it('should return 0 when multiplying 0 by 3', function() {
 assert.equal(0, multiplyByThree(0));
 });
});
That's about as simple as it gets with JavaScript testing.
Oh, so Mocha lets us define tests, which then test that values are true and reports on the results?
Sort of, but no, not really. Mocha only lets us define our tests. It doesn't actually give the assertions. In the code above, Mocha provides the describe and it functions, which Karma runs for us, but we have to find another tool to give us assert.
But whyyyyyy?
Because... reasons.
I'd like a masala chai, please
Node actually provides us some basic assertions. You could definitely use those, and they would probably be sufficient for all your Vue.js testing needs. The template we're using went with the Chai assertion library. Continuing our theme of a dramatically unopinionated software development stack, Chai actually provides multiple styles of assertions. These three statements mean the same thing.
foo.should.be.a('string');
expect(foo).to.be.a('string');
assert.typeOf(foo, 'string');
Again you might ask, but whyyyyyy?
It is what it is, and the why isn't super important. I would recommend picking one style and ignoring the others. For me, assert is the most straight forward, as I have a harder time remembering what combination of nondescript English words make up the BDD style code of should and expect, and the whole chaining thing gives me a case of the heebie-jeebies.
If we look back at the Karma example test above, we will see that while Karma provides the describe and it, we're going to be using Chai for the assert.equal.
Fake it till you make it
Spies and stubs and mocks and sandboxes and servers... head spinning...
At this point we have an almost completed, if not overwhelming unit testing stack for our Vue.js application. There are two more major pieces to cover, starting with Sinon.
Sometimes the code you are testing calls a function that you don't want to test. The two classic examples are HTTP requests and database calls, but it could simply be that the function being called is tested elsewhere (as it should be) or is third party code. We're not actually interested in testing that function, so we need a way to exclude it from the scope of our test. This is what Sinon does.
Sinon can confuse the heck out of you if you're not careful. It isn't entirely Sinon's fault though. It provides a sort of abstract function to begin with, then there is various jargon that we've probably never heard before. Don't forget the additional layer of assertions that Sinon gives us on top of our already existing Chai assertions (and Node assertions while we're at it).
We get by with a little help from our friends - the default Vue template installs two additional plugins, sinon-chai and karma-sinon-chai. These somehow make the different components all work together in harmony.
Sinon gives us three tools with various levels of abstraction - spies, stubs, and mocks. This article does a great job explaining Sinon and when to use each different tool. But Sinon also gives us some specialized tooling for faking calls back to the server. It's worth reading about since you will probably need to mock API calls at some point.
Any sufficiently advanced technology is indistinguishable from magic
If you're looking in the default test that the template provided for us, Hello.spec.js, you'll notice that we're not importing any of these libraries. There's no mention of Chai or Mocha or Matcha or Sinon. That's part of what got us into this whole mess in the first place, yet it also makes our lives easier by not having to think about them. The test runner and npm take care of all of the imports and dependencies so we simply have to write tests.
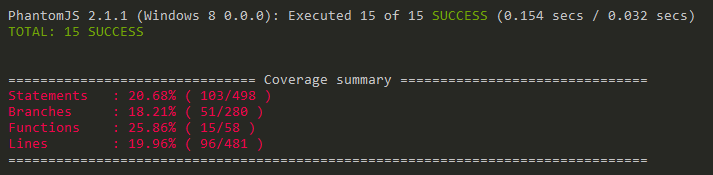
It's great that you are now testing your code. Vue.js testing is simple, right? Well, wouldn't it be nice to have a tool that shows you what parts of the application you are testing and what still needs tests written? And wouldn't it be even better if this was already installed, in place, and completely automatic so that we simply have to open it up and get the results? Way ahead of you. Okay, the Vue devs are anyway.
In the unit tests folder in your project, there should be a subdirectory named coverage with one more directory, and inside that one an index.html file. Assuming you have run your unit tests already, you can open that up and see an incredible breakdown of your project and its test coverage. Wunderbar!
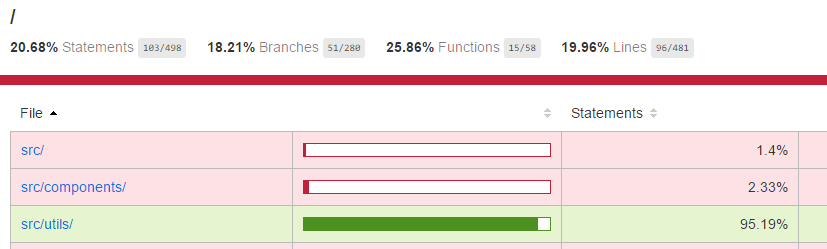
This report is brought to you by karma-coverage and Istanbul.
Down the Vue.js testing rabbit hole
Hopefully this helps clear up the Vue.js testing landscape for you, or at least points you in the right direction. I plan on writing more about Vue and Vue testing in the future, so subscribe to my RSS feed or to the newsletter signup below. I'm also available for hire - and I promise I'm a more consistent tester than the coverage reports show!