Step 3: Setup & Project Structure
This is part 3 of an 18 part series titled Vue.js Application Tutorial - Creating a Simple Budgeting App with Vue. It is highly recommended that you read the series in order, as each section builds on the last.
- Step 0: Intro
- Step 1: Planning Your Application
- Step 2: Data Architecture
- Step 3: Setup & Project Structure
- Step 4: Create & View Accounts
- Step 5: Edit & Delete Accounts
- Step 6: Adding LocalStorage to our Vue.js Application
- Step 7: Interlude & Refactor
- Step 8: Budgeting
- Step 9: Racing Through Budgets
- Step 10: Styling & Navigation
- Step 11: Finishing Budgets with Vue.js Dynamic Components
- Step 12: Planning for Transactions
- Step 13 - All Aboard the Transaction Train
- Step 14 - User Testing
The next entry is expected to be published on 03 August 2017. Sign up using the form at the bottom of this post to receive updates when posts are published.
For the sake of this tutorial, I'm going to assume you are at least marginally familiar with modern front end web development and Vue.js. If not, I recommend you go through the Vue.js intro tutorial. It is great and provides a good, quick overview of what Vue is all about. If NPM, Webpack, and ES6 are completely unfamiliar to you, you might still make it through the tutorial, but it will be more difficult.
Begin by installing vue-cli and setting up the default Webpack project template. The template will walk you through a few setup prompts. Use the standalone build, install vue-router. You can use ESLint and install the test components - we won't discuss them here, as they are outside the scope of the tutorial, but it's a good idea to write tests for almost any application!
(I named my application Budgeterbium, because I name most of my projects after elements, space, or other sufficiently geeky things. You can call it whatever you'd like.)
$ npm install --global vue-cli
$ vue init webpack budgeterbium
$ cd budgeterbium
$ npm install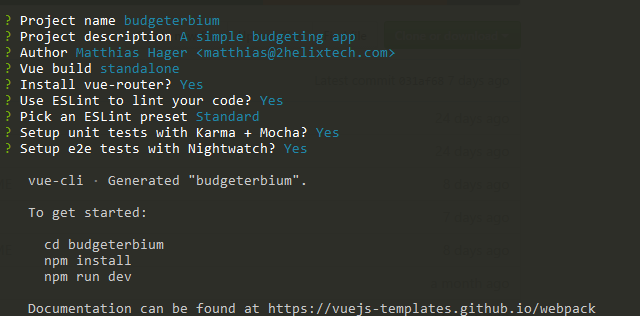
The application will need to manage data and share information between components. For this we'll use the excellent vuex. Since we will be using local storage, we will rely on localforage to provide a consistent, clean API. We're going to use Bulma to add a little bit of styling, and rely on SCSS. These commands will install the dependencies we need and save them into our package.json.
$ npm install --save vuex bulma localforage
$ npm install --save-dev sass-loader node-sass
You can now run npm run dev to start a test server and open your browser to localhost:8080. You may also have to run npm install --save-dev babel-runtime to get a working server.
(If you are not clear what exactly is happening with npm run dev, check out the first few sections in my overview of Vue.js testing.)
Here is a look at the default project structure for this template.
build/
config/
src/
 assets/
 logo.png
 components/
 Hello.vue
 App.vue
 main.js
static/
test/
.babelrc
.editorconfig
.eslingignore
.eslintrc.js
.gitignore
README.md
index.html
package.json
The entry point for the application is main.js. It loads Vue, then loads our App.vue and initializes the application. All App.vue does right now is define a little bit of layout and then include the Hello.vue component. The resulting application shows the Vue logo and a handful of links.
.vue files are a combination of an HTML template, JavaScript which typically defines a single Vue component, and styles that are applied to that particular component. The files are pre-processed by vue-loader, which was installed with the application template. Most programming editors and IDEs have Vue.js highlighting plugins you can install to handle these files.
Our first step is to revamp the architecture into a modular system. You might think this is overkill for tutorial purposes, but I want you to start thinking about what it is like to build a serious, scalable application. The flat file format the template gives us will start to get unwieldy once you have a few dozen components. We are going to take a more modular approach. Our src folder will end up looking like this:
app/
 accounts/
 components/
 AccountsListView.vue
 vuex/
 accounts.js
 index.js
 mutations.js
 index.js
 routes.js
 App.vue
 index.js
 routes.js
 vuex.js
assets/
router/index.js
store/index.js
main.js
This layout was inspired by this answer on the Vue.js forums about structuring large applications.
Budgeterbium uses vue-router and vuex, so we get those ready now. In main.js we import them and tell Vue to use them. We can go ahead and define our router object, and setup the export/import chains that help us manage the various modules we're building. We insert the route component into our App. From that point, every time the user navigates to a route it will be loaded to that spot in the template.
// The Vue build version to load with the `import` command
// (runtime-only or standalone) has been set in webpack.base.conf with an alias.
import Vue from 'vue';
import { App } from './app';
import router from './router';
import store from './store';

/* eslint-disable no-new */
new Vue({
 el: '#app',
 store,
 router,
 template: '<App/>',
 components: { App }
});
Notice that we are using some ES6 conventions in our application. If you are not familiar with all of the syntax it is worth reading up on it.
Our import chain looks fairly complex. The way to think about it is that everything feeds upward via an index.js file.
This is a lot of boiler plate before we even start writing real code! If you have only been reading along so far and have not committed anything to disk, this is a good time to start. You can jumpstart by cloning from this point in the repo - although it's important to understand everything that has happened in the preceding steps.
We are going to go ahead and duplicate the existing accounts/ directory and setup placeholders for transactions and budgets. This will demonstrate the simplest method for adding a new module. After you duplicate the module and rename it, don't forget to update app/routes.js and app/vuex.js with the new modules, as well as changing the list view routes for each module.
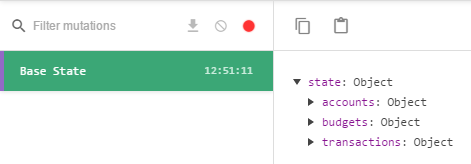
Once everything is in place, you can visit http://localhost:8080/budgets and http://localhost:8080/transactions. If you are using the Vue.js Chrome extension you can also view their presence in the store.